Chocolate Mug Cake

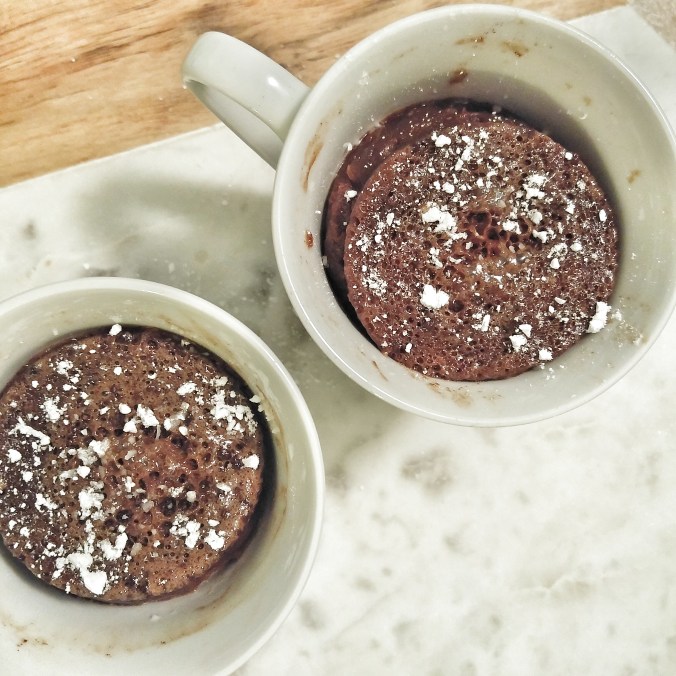
So it’s Friday night and you’re tired after work, but you really feel like something chocolaty. Welcome to my world. Chocolate mug cake to the rescue! No no no, its not a typo, it really is a Mug cake, a super easy one at that. Moist (love that word) and gooey at the bottom, these are great even for guests! Follow the simple steps below and you’ll beat the chocolate craving in no time!

Prep time 15 min, Cooking time 1 min, Makes 1 cup

20160226_210551-01.jpeg

20160226_210701-01.jpeg

Chocolate Mug Cake

40 g Chocolate (could be dark, could be milk doesn’t matter, just get it in there)

40g butter

4tsp dark brown sugar

4tsp self raising flour

2tsp cocoa powder

6 tsp milk

1 large egg (beaten)

  1. Place the butter and chocolate into your chosen mug and heat in the microwave until just melted and mix well.
  2. Add the milk and sugar to the mixture and mix well, ensuring no lumps are formed. (Warming the milk slightly may aid in this process)
  3. Add the flour, cocoa powder and egg mixing well between each ingredient.
  4. To cook place in the microwave on high for 45 seconds to 1 minute. Do check on your cake from 45 seconds as individual microwaves may vary in power. Do not overcook. Cake should be gooey in the centre.
  5. Enjoy!

20160226_210531-01.jpeg

One Pot Cottage Pie

A great comfort food that will give loads of left overs, this cottage pie is especially great in the winter time. I however am a crazy person and have made it smack bang in the middle of summer. Thank goodness for air conditioning!

This is a great pie to make when you have lots of left over vegies that just need to be eaten. With a cheesy potato-y top, it’s a sure fire way to get kidlets to eat their vegies!

20160223_210014-01.jpeg

One Pot Cottage Pie

Prep time 15 mins, Cooking time 50 mins, Serves 8 – 10

1 large onion – diced

1kg beef mince

4 cloves garlic – chopped finely

2 carrots – diced

½ head broccoli – chopped into small heads

¼ red cabbage – sliced finely

¼ green cabbage – sliced finely

1 cup frozen peas

1 cup frozen beans

5 large potatoes – mashed

810g tin crushed tomato

¾ cup grated cheese (I used a mix of parmesan and tasty)

½ cup red wine

¼ cup Worcestershire sauce

3 tbs tomato paste

3 tsp sugar

4 heaped tsp beef stock powder

3 heaped tsp Gravox traditional gravy – powdered

3 sprigs fresh oregano

3 fresh bay leaves

1 tbs butter

¼ cup milk

Salt and pepper to taste

20160223_210022-01.jpeg

  1. Prepare a large pot that can be used on a stove top as well as oven by heating some oil on a medium/high heat.
  2. Brown the onions and garlic
  3. Add the minced beef. When half cooked sprinkle over the powdered beef stock and mix through. Cook until beef is no longer pink.
  4. Add all the remaining ingredients (except the mashed potato, cheese, butter and milk) and combine.
  5. When bubbling reduced the heat and simmer on medium for 30 minutes or until the liquid is reduced.
  6. Preheat oven to 180 degrees C.
  7. Meanwhile prepare the potatoes. Dice into 3cm cubes and boil until soft. Drain and add butter and milk and mash well. Add salt and pepper to taste.
  8. When mince mixture is reduced remove from heat, spoon over mashed potato and sprinkle generously with cheese.
  9. By this time the oven should be at temperature. Move entire pot of mince and potato to the oven and cook for a further 10-15 minutes, or until the cheese has melted and gone golden.
  10. Now you’re ready to serve!

~A

Strawberry & Cherry Lemonade Crumble

Think strawberry lemonade in cake form! This delicious Strawberry and Cherry Lemonade Crumble is just that! With a delicious crumble topping that doubles as the base as well, this crumble can be served cool as a slice or warm with ice cream and is sure to be a hit at any social gathering.

It’s simple, effective and delicious; the only hard part is waiting an hour while it cooks!

Makes – 8-10 slices, Prep time – 20 mins, Cooking time – 60 -75 mins, Total time – approx. 3hrs (to allow for cooling before cutting)

img_20160222_123511.jpg

wp-1456108259249.jpg

Strawberry & Cherry Lemonade Crumble

Base and Crumble

115g unsalted butter – melted

½ cup raw sugar

¼ cup dark brown sugar – packed

1 ½ cup plain flour

Filling

1 large egg

½ cup sour cream

1/3 cup caster sugar

2 tbs lemon juice

2 tsp vanilla extract

¼ cup plain flour

Strawberry and Cherry Layer

1 heaped cup frozen strawberries – chopped

1 heaped cup frozen cherries – chopped

1/3 cup caster sugar

2 tbs lemon juice

¼ cup plain flour (can use less if mixture is not very runny)

  1. Preheat oven to 180 degrees C. Lightly oil a round fluted flan tin with a loose base, and place onto a large baking tray (makes removing the tin easier due to the loose base).
  2. Create the base and crumble topping.
    1. Melt the butter add the sugars and whisk to combine
    2. Add the flour and stir to combine. When combined the mixture should be crumbly and dry with some larger pieces.
    3. Set aside ¾ cup of crumble mixture.
    4. Place remaining crumble mixture into the pan and using fingers press into the base and sides of the tin until firmly packed and smooth.
    5. Set aside.
  3. Create the filling.
    1. In a bowl crack the egg, add the sour cream, sugar, lemon juice and vanilla. Either whisk by hand or beat with an electric mixer until smooth.
    2. Add the flour and continue to mix until smooth.
    3. Bring back the pan and pour the filling mix onto the base you have just made. Make sure to jiggle the pan and use a spatula to ensure a smooth surface.
    4. Set aside.
  4. Create the strawberry and cherry layer.
    1. In a bowl add all ingredients and toss well to combine.
    2. When using frozen berries there will be a lot of moisture released when they thaw so add in the flour a little at a time stopping when mixture looks thick, but not cakey.
    3. Smooth the fruit layer over the filling and smooth as best you can with a spatula.
  5. Sprinkle remaining ¾ cup of crumble mix over the fruit layer. To make larger crumble give the mix a small squeeze before sprinkling over the top.
  6. Bake for 60-75 minutes. This time will depend on your oven and how much liquid is in your fruit mix. Bake until golden brown on top and you can see the fruit starting to bubble through. It is better in this instance to watch from about 45mins, you want to be watching your creation more so than the clock.
  7. When baked, remove from the oven and set aside to cool for a few hours, to speed up this process you can also place into the fridge.
  8. If serving with ice cream, serve hot right out the oven. If wanting to turn it into more of a slice ensure it is fully cooled before cutting as it will likely fall apart!
  9. Enjoy!

wp-1456108264709.jpg

~A

Classic Chocolate Chip Cookies

Today I woke up and decided to bake. It’s been a while, I have to be honest, but since starting this blog my creativity and want to bake has been sparked. I thought what better way to kick off then with some classic chocolate chip cookies.  These cookies are super easy, nice and chewy, and the best part is they are full of chocolate!

Prep – 20 mins, Baking – 12 mins, Makes – 18-20

wp-1456029228190.jpg

wp-1456029415910.jpg

Classic Choc Chip Cookies

1 ¾ cups plain flour

½ tsp bicarbonate of soda

1 tsp salt

70g unsalted butter, melted

¾ cup dark brown sugar, packed

½ cup caster sugar

1 whole egg

1 egg yolk

2 tsp vanilla extract

1 ½ cup chocolate chips – I used half milk chocolate, half dark chocolate.

wp-1456029027958.jpg

  1. In a large bowl add sift the plain flour, bicarbonate of soda and salt together and set aside.
  2. Melt the butter in another bowl, then mix both sugars in with an electric beater (or if you’re feeling strong stir it enthusiastically by hand). You will know when to stop when the mixture is combined and smooth and shiny.
  3. Into the sugar mixture add the egg, then the egg yolk, and finally the vanilla, beating in between until combined.
  4. Pour the flour slowly into the mixture and combine. Once smooth add the choc chips.
  5. Set cookie dough in the refrigerator to cool for about 10 minutes (cooling the dough helps the cookies keep their shape when baking)
  6. Preheat the oven to 180 degrees C.
  7. Line two baking trays with baking paper. Once the dough is cool, scoop into balls (about 1 heaped tablespoon worth) and place onto the lined trays. Bake for 10-12 minutes (depending on your oven this may be more or less time). Remove the cookies when the edges are just starting become golden and the centre looks just slightly undercooked, as this will keep the centre chewy.
  8. Once removed from the oven place the cookies (while still on the baking paper) onto a cool surface and allow to sit for 5 minutes. During this time they will still cook slightly. Once cooled enough to touch transfer the cookies to a cooling rack.

If there is any remaining dough remember to keep it in the fridge between batches of cookies.

wp-1456029032681.jpg

Enjoy!

~A

Country style Chicken and Leek Pie

Chicken and Leek pie is one of those things that just screams comfort food to me. Deliciously creamy on the inside with amazingly crunchy puff pastry on top, this pie is sure to appeal to just about everyone! This is a favourite of my husband’s and one of the only ways I can get him to touch leek! He especially loves it when I add the “swirls” as he calls them, on top.

Prep time 10 mins, Cooking time 40 mins, Serves 4-6

wp-1455882246926.jpg

wp-1455880750079.jpg

Country Style Chicken and Leek Pie

2 Skinless chicken breast fillets – diced into 2cm cubes

1 Large leek – chopped into rounds, about 1cm thick

2 tbs butter

1 tbs plain flour – to thicken

½ cup thickened cream

½ cup milk

2 sprigs of thyme

1 tsp Chicken stock powder

1 sheet short crust pastry (for the base, you will need enough to cover the base and sides of your baking dish)

2 sheets puff pastry (for the pie lid, and of course the swirls!)

Sea salt and cracked pepper to taste

  1. Pre heat oven to 180 degrees C. In a large frying pan over a medium/high heat add 1tbs butter and the chopped chicken to the pan and cook until golden. Set aside but keep warm.
  2. Add ½ tbs of the remaining butter and chopped leek to the pan and sauté until the leek is tender. Set aside with the chicken.**
  3. In the pan now add the remaining butter and flour, stirring until combined, then add the cream and milk, stirring gently.**
  4. Reduce to a low head and add to the cream mixture the chicken and leek, the thyme and chicken stock. Let simmer for a few minutes until the sauce is thick enough to your liking.
  5. Meanwhile, prepare your baking dish by lightly greasing and laying down a sheet of your short crust pastry and press into the sides and base of the dish lightly. When ready fill the dish with the chicken mixture. Lay a sheet of puff pastry as a lid to close the pie, pressing down around the edges of dish to seal. For extra points, go ahead and slice the remaining sheet of puff pastry into 1 cm strips. Roll these strips up to resemble the sliced leek and place on top of your pie lid.
  6. Brush the pie with egg wash and place into the oven and bake for 30-40minutes, or until pastry is cooked and golden brown.
  7. Enjoy!

imageimage

**Added extra – If you would like to add some white wine into the dish you would do so at this stage, sautéing the leek until the alcohol has evaporated. Also, if you want to get extra fancy, why not try adding in a tablespoon of Dijon mustard.

~A

Pork and Prawn Dumplings

These delicious Pork and Prawn Dumplings are sure to get your taste buds firing. Crispy underneath with just the right amount soft deliciousness on top, you wont want to stop at just one! Perfect for parties, or anywhere finger food is acceptable (like my couch with my cat, or Lauren’s couch with her dog) you can’t go wrong with these babies!

Prep time 1 hr, Cook time 30 mins, Total time 1 hr 30 mins, Makes 48

20160216_194930-01

Pork and Prawn Dumplings

4cm pieces of ginger, peeled

250g Chinese cabbage, finely shredded

250g minced pork

250g prawns, chopped finely

4 spring onions, finely chopped

2 tbs soy sauce

1 tbs oyster sauce

2 tsp sesame oil

1 tbs rice wine/cooking sake

Cornflower, for dusting and extra if filling needs to be thickened

2 x 275g pkts gow gee pastries (wrappers)

1/3 cup (80ml) peanut oil

1 tbs salt

  1. Place shredded cabbage in a large bowl and sprinkle with salt then leave for 30 minutes.
  2. While cabbage is sitting, chop the prawn meat finely and place in a separate bowl with the pork mince and spring onions.
  3. Add the sauces directly to the meat mixture and combine.
  4. Returning to the cabbage, thoroughly squeeze to removed all liquid then add to the meat.
  5. Line a large tray with baking paper and dust with cornflour. Wet the edge of a wrapper with a little water and place two level teaspoons of filling in the centre (do not over fill!). Fold the wrapper in half and using your thumb and index finger pleat the edges, pressing them together to create a seal. Place the completed dumplings in a single layer on the prepared tray. **20160216_192206-01
  6. Heat 1 tbs peanut oil in a non-stick frying pan over a medium to high heat, adding 12 dumplings at a time pleated side up in a single layer and cook for 1-2 minutes or until brown underneath. Add 1/2 a cup of boiling water to the pan and partially cover with a lid, cooking for a further 8-10 minutes or until the water has evaporated and the dumplings are crisp on the bottom.
  7. They are now ready to eat! Just add in your favourite dipping sauce and you’re good to go.

**Dumplings can be made up to six hours in advance, but must be stored in a air tight container in the refrigerator.

~A + L

20160216_194307-01

20160216_192151-01

Chicken Yakisoba

One of my favourite Japanese dishes would have to be Yakisoba. To me it’s like a comfort food, but with veggies. Yaki, meaning grilled and soba meaning noodles, this meal of grilled noodles is easy to make in a fry-pan or wok.

It’s one of those meals you can get just about anywhere in Japan, but the best comes from street vendors or little hole in the wall restaurants.

In Australia finding the right ingredients to get the taste just right can be a bit of a challenge. If you’re lucky enough to live near an Asian grocery store you might be able to find pre-made Yakisoba sauce, if not, try this recipe it’s pretty good!

Prep time 10 mins, Cook time 20 mins, Total time 30 mins, Serves 4

20160215-892809535

Chicken Yakisoba

3 Shitake mushrooms – sliced (can be replaced with regular mushrooms if unavailable)

1 Brown onion – sliced into thin wedges

1 Carrot – halved and sliced on an angle

1 Bunch of broccolini chopped roughly

4 Cabbage leaves – chopped

2 Small chicken breasts – diced (can be replaced with your choice of meat, beef, pork, prawns)

1-2 Tbsp peanut oil

Freshly ground black pepper (to taste)

Yakisoba noodles (if unavailable, ramen or hokkien will also work)

Yakisoba Sauce

80ml Worcestershire sauce

60ml oyster sauce

40ml ketchup

30ml soy sauce

30ml sugar

  1. Slice the mushrooms, carrot and the onion. Chop the brocollini and the cabbage into smaller pieces. Cut the meat into 1 inch pieces.
  2. Mix the sauce ingredients in a small bowl and set aside from later.
  3. In a wok, heat the oil on medium to high heat. Cook the chicken through until there is no pink visible.
  4. Add the vegetables into the wok and stir fry until soft.
  5. Add the black pepper and ¼ of the Yakisoba sauce and stir, lower the heat to medium.
  6. Cook noodles of choice as per packet instructions. When soft gently pull apart and drain, then add to the wok. Stir noodles into the mixture being careful not to burn the noodles on the bottom of the wok
  7. Add remaining sauce (if you don’t like it super saucy don’t add all of it) and mix through.

Optional extras

  • Feel free to add in any extra vegies, things like zucchini and capsicum also taste great in this dish!
  • If you feel like being really fancy feel free to top the dish with some strips of dried seaweed and pickled red ginger, but if you’re like me you’ll just tuck in right away!

Itadakimasu!

~A

Spicy Chicken and Coconut

This delicious recipe was introduced to me by mother dearest, goodness knows where she found it but it has fast become one of my favourites! It’s super quick and easy, perfect for lazy nights when you want to pretend you’ve made an effort!

Prep time 10 mins, Cooking time 10 mins, Total time 20 mins, Serves ~ 4

image

Spicy Chicken and Coconut

2 tbs peanut oil

6 chicken thigh fillets, chopped

2 medium onions, sliced

1 large red capsium, chopped

1 cup coconut milk

1/4 cup red curry paste

1 tbs fish sauce

1/2 cup water

1/4 cup fresh basil leaves, shredded

  1. Heat half the oil in a wok (frying pan works just as well if, you know, a wok is too much effort).
  2. Fry the chicken in batches till golden brown. Remove from wok.
  3. Add to wok remaining oil and onions and capsicum. Cook until the onions are just soft.
  4. Add back in the chicken as well as the coconut milk, curry paste, fish sauce and water until the mixture is boiling then toss in the basil.

Now your done!

Time to sit on the couch, relax and eat curry.

~A