Quick Waffles

Just about every time I visit my Mum we have either pancakes with blue berries or waffles with blue berries and ice cream. With Mother’s Day just around the corner why not treat your Mum to some home made waffles?

This recipe is an oldie but a goodie and anyone with a waffle maker can master this one.

Let me know what you think in the comments below, especially if you try this to treat your Mum!

Prep time – 5mins, Cooking time – 3mins, Makes 4

image

image

Quick Waffles

2 eggs

3/4 cup milk

2 tbs vegetable oil

1 cup self raising flour

1 1/2 tsp baking powder

1 1/2 tsp sugar

1/2 tsp vanilla essence

  1. Preheat your waffle maker
  2. In a bowl beat the eggs until frothy, then add the milk, oil and all dry ingredients until smooth.
  3. Spray your waffle maker with a light oil and then add 1/2 cup of the batter to the hot waffle maker and close the lid.
  4. Remove from waffle maker when golden brown or after about 3mins.
  5. Serve with your favourite berries, ice cream and maybe syrup.
  6. Enjoy! 😃

~A

image

Chia Pudding & Cherry Berry Bliss Smoothie Bowl

I love fresh fruit for breakfast, but sometimes depending on the time of year you just can’t get the good stuff like Cherries, Raspberries, Mangoes etc. So where the season fails me, the freezer section at the grocery store does not! I love buying frozen fruit, especially living in North Queensland where it’s always a thousand degrees hot, using frozen fruit is the best way to start the day on a cool note.

One of my favourite ways to prepare said fruit for breakfast is as a smoothie. They are quick to make and eat (which is great when you have to be at work early in the morning) and best of all they are filling. When I have more time I like to make a bit more of an effort and create smoothie bowls. This is one of my latest creations. Let me know what you think in the comments below 🙂

Prep time – 5 mins + over night for the Chia pudding, Serves 1.

dsc_0512-01.jpeg

Chia Pudding & Cherry Berry Bliss Smoothie Bowl

1/4 cup chia seeds

1/4 cup milk (almond milk, coconut milk, cow’s milk, the choice is yours)

1 tsp cinnamon sugar

1 handful frozen raspberries

1 handful frozen cherries

1 handful frozen diced mango

1 cold banana

  1. To make the chia pudding you will need to start the day before as the chia seeds take time to soak up the milk. In a glass place your chia seeds, milk and cinnamon sugar, mix well and leave in the fridge over night. The next morning you should have a thick pudding of chia seeds. Add more milk and stir if too thick.
  2. In a food processor or blender ( I used my old magic bullet) place banana, raspberries, cherries and mango and top with cold water. If you wish you may also at this point add some protein powder or other supplements. Blend until smooth.
  3. In a shallow bowl pour your smoothie and top with chia pudding. I also like to place a few additional fruits on top for some more interest and the fact that its delicious!
  4. Enjoy!

~A

dsc_0516-01.jpeg

Heritage Tomato & Pesto Spaghetti

There is nothing quite like a yummy bowl of pasta to satisfy a hunger!

Today we are keeping it light, this time with fresh heritage tomatoes and zesty lemon basil pesto this pasta is great eaten warm or cold the next day as a pasta salad.

This colourful dish is great for a midweek dinner or a quick meal after a busy weekend.

Prep time – 5 mins, Cooking time – 20 mins, Serves 6

20160428-353035495.jpg

201604281546150555.jpg

Heritage Tomato & Pesto Spaghetti

500g spaghetti

1tsp olive oil

100g of prosciutto – sliced

350g cherry tomatoes, halved – I used heritage tomatoes for the colour

50g semi sundried tomatoes – chopped

60g baby spinach leaves

150g basil pesto – I used my Lemon Basil Pesto

Shaved parmesan and cracked pepper to serve

  1. Preheat oven to 150 degrees C. Cook the pasta in a large saucepan following the packet instructions. Cook until al dente. Drain, but reserve about 3/4 cup of the cooking liquid.
  2. Line a baking tray with aluminium foil and lay the slices of prosciutto evenly over it. Bake untill just crisp and set aside.
  3. In a frying pan add the oil, when hot add the tomatoes, string often. Cook until the tomato starts to soften, should take about 3 minutes. Add the spinach and cook until it just starts to wilt. Add the spaghetti to the pan along with the reserved liquid and pesto, tossing to combine.
  4. Break the prosciutto into shards, and add to the pasta tossing again to combine.
  5. Plate up and top with freshly shaved parmesan and pepper.
  6. Enjoy!

~A

20160428-306560828.jpg

ANZAC Biscuits with a Twist

Here in Australia it is the ANZAC day long weekend, and for us Aussies that means 3 things. First and foremost it’s an opportunity to honour our fallen soldiers and those still serving to protect our country. Secondly it’s a public holiday which is never a bad thing, and lastly it’s the perfect time of year to make ANZAC biscuits.

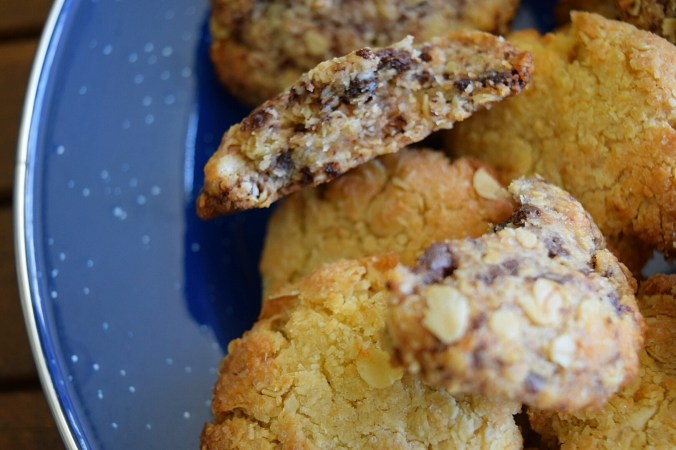
To me these biccies have to be soft and chewy, golden brown and super sweet, and that’s just how this recipe turns out.

To add a little bit of a twist, and to appease the chocolate fanatics out there half of this recipe was turned into chocolate chip ANZAC biccies 🙂

If you enjoy this post, please be sure to like it and subscribe to our mailing list, and feel free to share this recipe with your friends 🙂

Prep time – 10 mins, Cooking time- 10 mins, Makes 20

dsc_0499-01.jpeg

This weekend I have been fortunate enough to spend with my Husband and his Parents who live in a little village called Paluma which sits on the top of a mountain range. During the Second World War, Paluma was established as a major radar station, being used first by the American Army and then by the Royal Australian Air Force. Throughout the war years Paluma was used as a rehabilitation hospital site, and was also used for “jungle training” as conditions were similar to those in the South Pacific.  Timber was also cut in Paluma to aid the war effort (https://palumaeec.eq.edu.au/Aboutus/Pages/History-of-Paluma.aspx).

Paluma RAAF Base, in service from approx 1943-1946

NEA0523

Historical Ivy Cottage – still in use today as a tea house at the top of the Paluma Range

Left: Cottage used by Medics, still in use today    

Right: Log cabin built  by the American Army around 1943 to escape the weather

Today, looking at the village only a few remnants of the war remain. Only a few igloo style radar stations, some concrete slabs, and a few of the homes still used to this day which were built back then for use as barracks. If you didn’t know any better, the peace and quiet of this beautiful place now, would trick you into thinking it was always like this.

This time each year should be a reminder to us all that we should be kind to each other and aim to keep our beautiful country as peaceful as possible. Lest we forget.
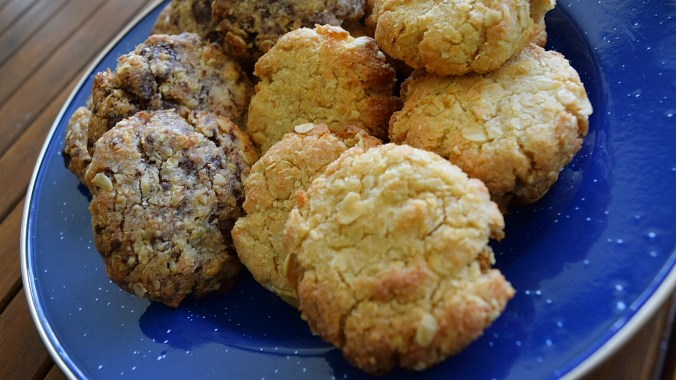
dsc_0492-01.jpeg

dsc_0491-01.jpeg

dsc_0489-01.jpeg

dsc_0493-01.jpeg

ANZAC Biscuits

125g butter

1 cup plain flour

1 cup rolled oats

1 cup desiccated coconut

¾ cup raw sugar

1 tbs golden syrup

1 tps baking powder

2 tbs hot water

Optional -1/2 cup finely smashed chocolate chips

  1. Heat oven to 180°C and line two baking trays with baking paper.
  2. In a small microwave safe bowl melt the butter and golden syrup.
  3. In a cup, mix the baking powder with hot water, be sure to stir well to remove any lumps, and add to the butter mixture.
  4. In a large mixing bowl mix together the flour, coconut, baking powder sugar and oats. Once mixed, create a well in the centre of the dry ingredients and pour in the butter mixture. Combine well until mixture will clump together and not crumble.
  5. Roll mixture into small walnut sized balls and flatten slightly. If using real butter these should spread out when baked, if you are using a butter substitute like margarine, you will need to flatten them more as they will not melt in the oven.
  6. Bake biscuits until they are golden but still soft in the centre, about 10mins. Remove from the oven and let stand until cool.

Enjoy!

~A

dsc_0488-01.jpeg

Pomelo Cupcakes

The nice thing about citrus fruits is that even when they have gone a bit soft and you wouldn’t eat them fresh out of their skin, they are still perfect for baking!

A few weekends ago one of my best friends gave me a few delicious home grown pomelos. I’d never had them before so I was pretty keen to give them a try and to find something yummy to add them into. So tonight after I had finished dinner and wanted something sweet I decided to try putting these citrusy delights to the cupcake test, and oh boy oh boy am I happy with how these turned out!

Pomelos are kinda like a grapefruit in flavour, not too sweet but also not too sour. If you wanted to you could substitute the pomelo in this recipe for your favourite fruit. The basic mixture is very versatile and would even taste great with chocolate chips thrown in. So don’t feel like you have to use pomelos, but if you have them I would recommend giving this one a try 🙂

Prep time – 10 mins, Cooking time – 20/25 mins, Makes 9

dsc_0473-01.jpeg

dsc_0475-01.jpeg

Pomelo Cupcakes

2 cups plain flour

3tsp baking powder

1/4tsp salt

3/4 cup caster sugar

1 egg

3/4 cup milk

3tbs vegetable oil

2tsp vanilla essence

Juice of 1 pomelo

Plus 1 additional pomelo sliced for decoration

  1. Preheat oven to 180 degrees C and prepare a muffin tray, set aside. In a large mixing bowl sift the flour, sugar, baking powder and salt.
  2. Making a well in the centre of the flour mix, crack in the egg and add the milk, vanilla, oil and pomelo juice.
  3. Mix well until all ingredients are combined and there are no lumps.
  4. Into your prepared muffin tray spoon about 3 table spoons of batter and top with a slice of pomelo.
  5. Bake for 20-25mins or until a skewer comes out clean. If you find your fruit browning place a sheet of aluminium foil over the top while baking.
  6. When cooked through, remove cakes from the tray and set aside to cool.  If you like them warm, I suggest serving with a sprinkle of icing sugar and a scoop of vanilla ice cream 🙂
  7. Enjoy!

~A

dsc_0468-01.jpeg

Passionfruit Curd

Here’s a yummy sweet and tart Passionfruit curd recipe to get those taste buds tingling!

201603201088766735.jpg

Why not try the curd with this super Easy Meringue?

img_20160320_155404.jpg

Or how about this yummy Orange Poppy Seed Cake with Passionfruit Curd & Glaze?

dsc_0392-01-01.jpeg

Passionfruit Curd

1 cup castor sugar

½ cup passionfruit pulp

5 large eggs yolks

4 tbs unsalted butter, cut into cubes.

  1. Combine sugar, passionfruit pulp, and egg yolks in a medium saucepan. Place saucepan over a medium head and whisk constantly until the curd has thickened and will coat the back of a spoon, usually about 8-10mins.
  2. Remove saucepan from the heat and stir in the butter, piece by piece, until melted. Cool completely and store in the fridge for up to 4 days.
  3. Serve with your favourite dessert!
  4. Enjoy 🙂

~A

img_20160320_102850.jpg

Pumpkin Soup

Now that its getting cooler (and by cooler I mean its stopped reaching 35 degrees every day… it actually didn’t get about 29 the other day! Admittedly it was raining all day… but it still counts!!!), and we are on our way to winter it’s time to start thinking about warm wintery dishes (if we crank the air con we can pretend…).

I was recently given a lovely little home grown butter nut pumpkin with strict instructions that it must be made into a soup, so what better way to kick off the season than with a perfect winter warmer soup – Pumpkin soup!

Prep time – 10 mins, Cooking time – 1 hr, Serves 4

dsc_0460-01.jpeg

dsc_0457-01.jpeg

dsc_0454-01.jpeg

dsc_0453-01.jpeg

dsc_0450-01.jpeg

Pumpkin Soup

1 large butter nut pumpkin -halved lengthways

2 rashers of bacon

1 red onion – quartered

2 tbs minced garlic

3 cups chicken stock

Salt and pepper

1/2 tsp nutmeg

cream – to serve

  1. Preheat oven to 210ºC.
  2. Remove seeds from your pumpkin and brush with olive oil. You may wish to set some seeds aside roast with the pumpkin for a crunchy soup topping!
  3. Season pumpkin well with salt and pepper, and add a generous coating of nutmeg.
  4. Place your pumpkin cut side up on a prepared tray and inside the cavity left by the seeds place the bacon, onion and garlic.
  5. Bake for about an hour until the pumpkin is soft and golden brown.
  6. Using a large spoon, scoop your pumpkin, onion and garlic and bacon into a food processor and fill with chicken stock. Process until smooth
  7. Top with toasted pumpkin seeds, pepper and a drizzle of cream. If you like you can also serve with  yummy crusty bread on the side!
  8. Enjoy!

~A

dsc_0457-01-01.jpeg

Corn Fritters with Avocado & Sour Cream Dip

If you’re like me, then you come home of an afternoon strip off your clothes, flick on the A/C and telly then its off to the kitchen to raid the fridge in a ravenous hunger fueled, undie clad frenzy only to find no food, no snacks because you’re “trying to be healthy”. Sound familiar?? I feel for you. So here I have an easy quick fix to your problems, make this on the weekend to have afternoon snacks all week long that won’t make you feel terrible!

Prep time – 10 mins, Cooking time – 10 mins, Serves 4

dsc_0464-01.jpeg

dsc_0462-01.jpeg

dsc_0463-01.jpeg

dsc_0465-01.jpeg

Corn Fritters with Avocado & Sour Cream Dip

1 avocado, halved peeled and stone removed

2 heaped tbs extra-light sour cream

1 small red chilli – deseeded and chopped finely

Salt and pepper- to taste

420g can corn kernels – drained

2 eggs – whisked

2/3 cup plain flour

1/3 cup grated parmesan

2 tbs vegetable oil

3 tbs chopped chives

  1. In a food processor add the avocado, chilli and sour cream, process until smooth. Season with salt and pepper to taste. Set aside
  2. In a large mixing bowl add the corn, egg, parmesan and flour and whisk until well combined.
  3. In a large non stick frying pan heat the oil over a medium/high heat. Spoon a heaped table spoon worth of corn batter into the pan to make each fritter. Cook fritters until each side is golden. In between batches, transfer cooked fritters to a plate and cover to keep warm.
  4. Serve your fritters with the avocado and sour cream dip.
  5. Enjoy!

~A

dsc_0464-01-01.jpeg

Butter Chicken

Midweek is upon us yet again, and its the perfect time for an easy tasty meal that’s going to leave lots of left overs. Tonight’s midweek meal is a curry, a family friendly curry at that. It’s Butter Chicken! Yeah yeah you probably already knew that since you clicked the link but let me live a little.

The nice thing about this butter chicken is once you get past caramelising the onion (which is a must because it adds just the best flavour and depth to the meal) its really just a matter of chucking it all in the pot and walk away. There’s not a million and one spices you have to worry about, and if you have made just about any curry in the past you probably already have the spices needed.  So give it a try and let me know what you think!

Prep time – 10 mins, Cooking time – 40 mins, Serves 4

dsc_0448-01.jpeg

20160413-809652884.jpg

Butter Chicken

2 chicken breasts – diced

¼ cup vegetable oil

2 medium onions – chopped

2 tbs minced garlic

1 tbs chicken stock powder

2 tbs garam masala

2 tsp paprika

¼ tsp cinnamon

1 tsp sugar

2 tsp salt

410g can of chopped tomato

300ml heavy cream

2 tbs butter

  1. Heat the oil in a heavy bottom saucepan over a medium heat and add the onions. Cook slowly until golden, around 20 minutes. Reduce the heat if the onions start to get crisp or are browning too quickly.
  2. When onion is caramelised, add garlic and cook for about a minute, stir in garam masala, cinnamon, paprika, salt and sugar. Cook for a few minutes.
  3. Add tomatoes and cook for a further few minutes, then add the cream.
  4. Now, you have options here, if you’re feeling fancy you can puree the sauce. If you have an immersion blender use that, if not a regular blender will work, just mind the steam. I have an old Magic Bullet which did the trick just fine. If you’re just looking to put food on the table and get fed in a hurry then skip the puree, honestly it tastes just the same!
  5. Return the sauce to the pan and bring to a simmer. When just bubbling, add the chicken and stir through. Cover with a lid and allow to simmer for 15mins or until the chicken is no longer pink in the centre.
  6. When cooked, stir in butter. If needed add some more salt to taste.
  7. Serve with rice, pappadums or naan (or if your my husband… all three!)
  8. Enjoy!

~A

P.S. Thanks to foodess.com for the inspo on this one 🙂 As usual though I couldn’t help myself and have tweaked her recipe to make it a bit more to my tastes!

dsc_0447-01.jpeg

Triple Chocolate Chip Muffins

Who doesn’t like chocolate? If you find someone that doesn’t, well then there is something seriously wrong with them! These chocolate muffins are a serious indulgence. Chocolate base with two types of chocolate chips (thee if you don’t have a fussy husband who won’t let you use milk chocolate) brings all the yummy to these muffins.

Prep time – 10 mins, Cooking time – 20 mins, Makes 15

dsc_0445-01.jpeg

I remember a recipe similar to this that my mum used to make all the time when I was a kid. They were the best muffins ever, alas that recipe has been lost but I’d say this one comes in at a very close second. Rich but not too rich, good in the centre and crunchy on top, you definitely won’t be disappointed with these guys.

dsc_0441-01.jpeg

Triple Chocolate Chip Muffins

2 ½ cups self-raising flour

1/2 cup cocoa powder, sifted

3/4 cup dark chocolate bits

3/4 cup milk choc bits

3/4 cup firmly packed brown sugar

1 cup milk

1/2 cup vegetable oil

1 egg – lightly beaten

1 tsp vanilla essence

Icing

1/3 cup dark chocolate bits

1/3 cup milk chocolate bits

1/3 cup icing sugar

1/4 cup milk

1 tbs butter

  1. Preheat oven to 180 degrees C. In a large bowl sift the flour and cocoa powder. Mix in the chocolate bits and sugar and create a well in the centre of the bowl.
  2. In a small bowl mix the egg, milk, oil and vanilla and whisk lightly with a fork.
  3. Pour milk mix into flour mix and stir together with a wooden spoon until combined. If the mix is a little dry add a dash more milk.
  4. Spoon mixture into prepared muffin tins and bake for 20 mins.
  5. When cooked remove from muffin tins and allow to cool to room temperature.
  6. To create the icing, place chocolate, butter and milk in a microwave safe bowl and heat on high in the microwave for 20 seconds. Stir well until all the ingredients have melted and make a smooth mixture. Add the icing sugar and using a whisk, stir the mixture until smooth.
  7. Let mixture chill in the fridge to thicken for about 10 mins. When muffins have reached room temperature they can be iced.
  8. Enjoy!

~A

img_20160409_131719.jpg