Spaghetti Carbonara

This would be one of my husband Alex’s favourite pasta dishes, as we call it, Car-banana!  Who doesn’t love those gorgeous tendrils of carbohydrates, bathed in shiny, creamy eggs and piled high with crispy, salty bacon.  Did someone say bacon? OOOOH BACON. Then there’s the lashing of fresh shaved parmesan, herbs and just to add a little bit more grown up bang, a sprinkle of fresh birds eye chili!
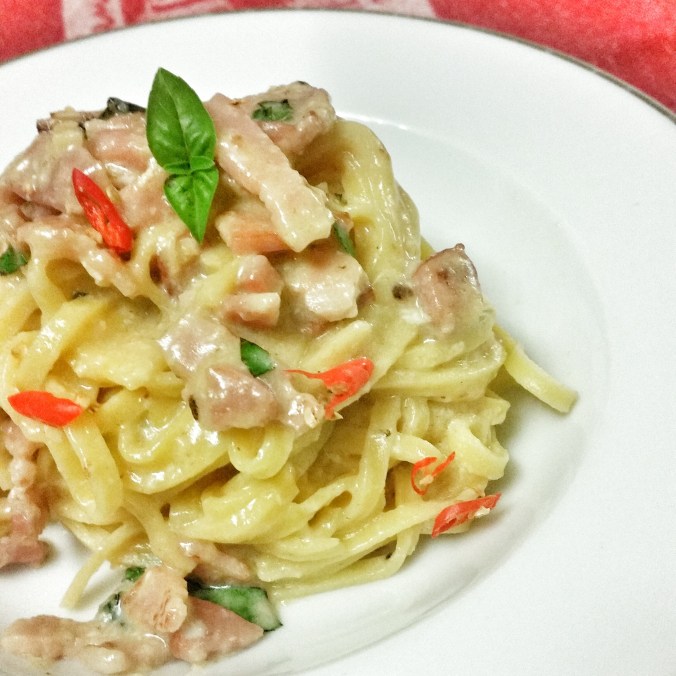
20160218_205508-01.jpeg

Spaghetti Carbonara

Prep time ~15 minutes, Cook time ~ 10 minutes – Total 25 minutes. Serves 6

500g Fresh spaghetti or linguine

Rock salt

12 rashes bacon (just the streaky bit, keep the eye for breakfast!), sliced in to 1cm batons

8 large eggs or 10 medium eggs, beaten lightly

1c grated parmesan cheese

2 tbsp fresh chopped basil

4 birds eye chili, finely sliced (seeds out if you dont like it too hot, or left out if you like it tame)

Fresh ground black pepper

  1. Bring a large pot of water to a rolling boil, season generously with rock salt, and cook pasta to direction as per packet – I find with fresh pasta, if you start the pasta just as you start cooking the bacon, it times quite nicely.  Drain the pasta, reserving approx 1/2c of the cooking water
  2. Drop the bacon into a just warm pan, then turn the heat up and cook for approx 8 minutes until its nice and crispy and has produced a bit of oil.  Add the cooked spaghetti and reserved water and stir.
  3. Add the beaten eggs, parmesan and a generous sprinkle of black pepper and toss to coat then continue cooking for a further 2 minutes – its REALLY important to keep the pasta moving at this point or you’ll end up with scrambled eggs and bacon.
  4. Once the sauce is nice and creamy, add the basil, and chili, and serve with some extra shaved parmesan.

ENJOY!

~LC

Pork and Prawn Dumplings

These delicious Pork and Prawn Dumplings are sure to get your taste buds firing. Crispy underneath with just the right amount soft deliciousness on top, you wont want to stop at just one! Perfect for parties, or anywhere finger food is acceptable (like my couch with my cat, or Lauren’s couch with her dog) you can’t go wrong with these babies!

Prep time 1 hr, Cook time 30 mins, Total time 1 hr 30 mins, Makes 48

20160216_194930-01

Pork and Prawn Dumplings

4cm pieces of ginger, peeled

250g Chinese cabbage, finely shredded

250g minced pork

250g prawns, chopped finely

4 spring onions, finely chopped

2 tbs soy sauce

1 tbs oyster sauce

2 tsp sesame oil

1 tbs rice wine/cooking sake

Cornflower, for dusting and extra if filling needs to be thickened

2 x 275g pkts gow gee pastries (wrappers)

1/3 cup (80ml) peanut oil

1 tbs salt

  1. Place shredded cabbage in a large bowl and sprinkle with salt then leave for 30 minutes.
  2. While cabbage is sitting, chop the prawn meat finely and place in a separate bowl with the pork mince and spring onions.
  3. Add the sauces directly to the meat mixture and combine.
  4. Returning to the cabbage, thoroughly squeeze to removed all liquid then add to the meat.
  5. Line a large tray with baking paper and dust with cornflour. Wet the edge of a wrapper with a little water and place two level teaspoons of filling in the centre (do not over fill!). Fold the wrapper in half and using your thumb and index finger pleat the edges, pressing them together to create a seal. Place the completed dumplings in a single layer on the prepared tray. **20160216_192206-01
  6. Heat 1 tbs peanut oil in a non-stick frying pan over a medium to high heat, adding 12 dumplings at a time pleated side up in a single layer and cook for 1-2 minutes or until brown underneath. Add 1/2 a cup of boiling water to the pan and partially cover with a lid, cooking for a further 8-10 minutes or until the water has evaporated and the dumplings are crisp on the bottom.
  7. They are now ready to eat! Just add in your favourite dipping sauce and you’re good to go.

**Dumplings can be made up to six hours in advance, but must be stored in a air tight container in the refrigerator.

~A + L

20160216_194307-01

20160216_192151-01

Raspberry White Chocolate Cheesecake

This cheesecake is one to pull out when you’re looking to be a bit fancy, its smooth, balanced and just that little bit POSH!

Prep Time 30 minutes, Cooking Time 30 minutes + chilling time, Serves ~12

img_20160214_210556.jpg

White Chocolate and Raspberry Cheesecake

1 1/4 cups choc ripple biscuits biscuits, crushed

1 cup cream, lightly whipped

1 teaspoon grated lemon rind

2 tsp McKenzies Gelatine powder dissolved in 1/4 cup boiling water, cooled

200g fresh raspberries

200g White Chocolate, melted

3/4 cup sugar

500g block PHILADELPHIA Cream Cheese, softened

75g butter, melted

Jelly Topping

400g fresh or frozen raspberries

2 tbsp caster sugar

2 tsp McKenzies Gelatine Powder extra, dissolved in 1/4c boiling water

  1. Combine the biscuits and butter and press into the base of a greased 22 cm spring form pan.
  2. Beat the PHILLY, sugar, and lemon rind until smooth. Stir in the gelatine mixture and fold in the melted white chocolate and cream
  3. Pour 1/3 filling into base and spread evenly, scatter half fresh raspberries over mix, pressing gently into the cream mix, then top with another 1/3 of the mix, and repeat with remaining raspberries, before topping with remaining filling.  Ensure the cake has a nice smooth finish before placing in the refridgerator to set.
  4. While cheesecake is setting, place extra raspberries and sugar into a small pot and heat over low heat until raspberries have cooked down, and sugar is dissolved.  Pass mixture through sieve to remove seeds and cool slightly.  Add dissolved gelatine and mix thoroughly.
  5. Once raspberry jelly is made, and cheesecake has set to the touch on the surface, carefully poor jelly mix over the top, before placing back in the fridge for 2-3 hours or until totally set, being careful to ensure cake is level.

Toblerone Cheesecake

This one would have to be, without a doubt, my all time absolute FAVOURITE cheesecake, and more than a few friends will put in a special dessert request for this one if they’re coming for dinner!

image

Toblerone Cheesecake

1c chocolate biscuits crumbs (Choc Ripple Works Well)

1/4c Almond Meal

80g Butter, melted

500g Philadelphia Cream Cheese

1/2c caster sugar

200g Toblerone Milk Chocolate, melted

1/2c thickened cream

Dollop Cream

Fresh Raspberries

1. Combine biscuits, almond meal and butter, press into 20cm springform pan. Chill.

2. Beat philly and sugar with electric mixer until smooth, beat in melted Toblerone and cream till will combined

3. Pour into base and chill for 2-3 hours until set, or overnight. Serve with Dollop cream and fresh raspberries.

Chicken Yakisoba

One of my favourite Japanese dishes would have to be Yakisoba. To me it’s like a comfort food, but with veggies. Yaki, meaning grilled and soba meaning noodles, this meal of grilled noodles is easy to make in a fry-pan or wok.

It’s one of those meals you can get just about anywhere in Japan, but the best comes from street vendors or little hole in the wall restaurants.

In Australia finding the right ingredients to get the taste just right can be a bit of a challenge. If you’re lucky enough to live near an Asian grocery store you might be able to find pre-made Yakisoba sauce, if not, try this recipe it’s pretty good!

Prep time 10 mins, Cook time 20 mins, Total time 30 mins, Serves 4

20160215-892809535

Chicken Yakisoba

3 Shitake mushrooms – sliced (can be replaced with regular mushrooms if unavailable)

1 Brown onion – sliced into thin wedges

1 Carrot – halved and sliced on an angle

1 Bunch of broccolini chopped roughly

4 Cabbage leaves – chopped

2 Small chicken breasts – diced (can be replaced with your choice of meat, beef, pork, prawns)

1-2 Tbsp peanut oil

Freshly ground black pepper (to taste)

Yakisoba noodles (if unavailable, ramen or hokkien will also work)

Yakisoba Sauce

80ml Worcestershire sauce

60ml oyster sauce

40ml ketchup

30ml soy sauce

30ml sugar

  1. Slice the mushrooms, carrot and the onion. Chop the brocollini and the cabbage into smaller pieces. Cut the meat into 1 inch pieces.
  2. Mix the sauce ingredients in a small bowl and set aside from later.
  3. In a wok, heat the oil on medium to high heat. Cook the chicken through until there is no pink visible.
  4. Add the vegetables into the wok and stir fry until soft.
  5. Add the black pepper and ¼ of the Yakisoba sauce and stir, lower the heat to medium.
  6. Cook noodles of choice as per packet instructions. When soft gently pull apart and drain, then add to the wok. Stir noodles into the mixture being careful not to burn the noodles on the bottom of the wok
  7. Add remaining sauce (if you don’t like it super saucy don’t add all of it) and mix through.

Optional extras

  • Feel free to add in any extra vegies, things like zucchini and capsicum also taste great in this dish!
  • If you feel like being really fancy feel free to top the dish with some strips of dried seaweed and pickled red ginger, but if you’re like me you’ll just tuck in right away!

Itadakimasu!

~A

Spicy Chicken and Coconut

This delicious recipe was introduced to me by mother dearest, goodness knows where she found it but it has fast become one of my favourites! It’s super quick and easy, perfect for lazy nights when you want to pretend you’ve made an effort!

Prep time 10 mins, Cooking time 10 mins, Total time 20 mins, Serves ~ 4

image

Spicy Chicken and Coconut

2 tbs peanut oil

6 chicken thigh fillets, chopped

2 medium onions, sliced

1 large red capsium, chopped

1 cup coconut milk

1/4 cup red curry paste

1 tbs fish sauce

1/2 cup water

1/4 cup fresh basil leaves, shredded

  1. Heat half the oil in a wok (frying pan works just as well if, you know, a wok is too much effort).
  2. Fry the chicken in batches till golden brown. Remove from wok.
  3. Add to wok remaining oil and onions and capsicum. Cook until the onions are just soft.
  4. Add back in the chicken as well as the coconut milk, curry paste, fish sauce and water until the mixture is boiling then toss in the basil.

Now your done!

Time to sit on the couch, relax and eat curry.

~A

Moroccan Lamb Shanks

Original recipe from Taste, however I added a couple of little extras to boost the yum factor.  These went down magnificently, even the fussier family members licked their plate clean!

img_20160214_204906.jpg

Moroccan Lamb Shanks

2 tbsp good quality olive oil

4 lamb shanks

3 chorizo sausages, quartered lengthways and diced, fried and then drain on paper towel

2 red onions, finely diced

2 cloves garlic, crushed

1 tbsp Harissa Spice mix

425g can crushed tomatoes – I try and use Australian grown where I can

1c beef stock

400g can chickpeas, drained and rinsed

400g sweet potato, peeled and diced in 1cm cubes

1c polenta

1 litre chicken stock

30g butter

  1. Preheat oven to 150°C. Heat 1 tablespoon oil in a large frying pan over high heat. Add lamb shanks. Cook, turning, for 5 minutes or until browned. Transfer to an ovenproof dish.
  2. Reduce heat to medium. Add onion, garlic, spice mix and remaining oil to frying pan. Cook, stirring, for 2 to 3 minutes or until soft. Add tomatoes and beef stock. Bring to the boil. Pour over lamb. Cover dish tightly with aluminium foilPlace lamb in oven. Cook for 3 1/2 hours. Stir in chickpeas, chorizo and sweet potato. Cover and return to oven. Cook for a further 1 1/2 hours or until lamb is tender. Remove from oven. Season with salt and pepper..
  3. Meanwhile, bring stock to the boil in a large saucepan over high heat. Reduce heat to medium. Add polenta in a thin, steady stream, stirring constantly. Cook, stirring, for 10 to 15 minutes or until mixture comes to the boil. Remove from heat. Stir in butter. Spoon polenta onto plates. Top with lamb shanks. Spoon over sauce.

Beef and Pasta Bake

This is one of the first things my mum let me make, which speaks for itself.  The original recipe comes from the wonderful world of The Women’s Weekly.  Its dead easy, very tasty, loaded with healthy goodness.

img_20160214_201629.jpg

Beef & Pasta Bake

4 tsp good quality olive oil

2 large onions, finely chopped

4 cloves garlic crushed (or 3 teaspoons of garlic from a jar)

4 rashes of bacon, finely diced

3 small carrots, finely diced

3 stalks celery, finely diced

500g button mushrooms, sliced

1kg beef mince

2 x 400g cans condensed tomato soup

2/3c tomato paste

2 tbsp tomato sauce

2 tsp dried oregano

500g spiral pasta (I prefer the high fibre pasta, but any is fine)

2 cups grated cheese

1/2c grated or shaved parmesan cheese

  1. Preheat oven to 180 degrees celcius
  2. Heat the oil in a large pan; cook the onion, garlic, bacon, carrot and celery, stirring, until the carrot is just tender.  Add mushrooms and cook a further 2 minutes.
  3. Add mince, and cook, stirring until mince has browned, breaking up any lumps.
  4. Add soup, tomato paste, sauce, and oregano; then simmer, covered for 15 minutes or until mix has thickened.  Season to taste.
  5. Meanwhile, cook pasta in a large pot of boiling water until just cooked, drain then add to beef mix.
  6. Place into a large retangular baking dish, then top with cheeses.  Bake in oven for 15 minutes until top is golden brown.