Pizza Scrolls

Who doesn’t love pizza? What better way to enjoy an easy pizza snack than as a scroll!  Super simple dough base that you can top with whatever takes your fancy at the time, fantastic for lunch box snacks or just to have when the hunger bugs are biting.  Let us know what your favourite toppings are for making these, we like the classic Hawaiian, jalapenos supreme or my personal favourite, tandoori chicken with crumbled feta!
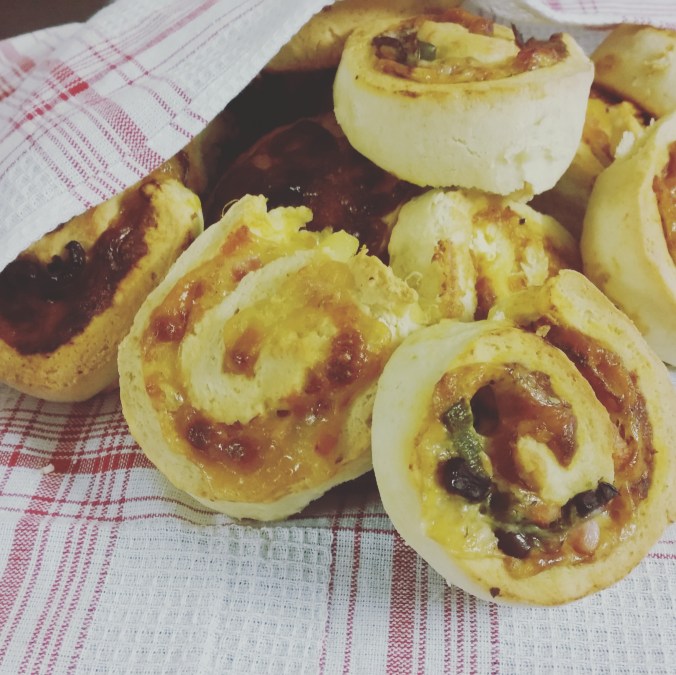
img_20160228_213214.jpg

Pizza Scrolls

Basic Dough Recipe

2c Self raising flour

1 tbsp caster sugar

60g butter

2/3c milk

  1. Combine flour and sugar in a large bowl, add chopped butter and rub in until mix resembles a fine crumb.
  2. Add milk and work with a table knife until dough combines together.  Tip onto a lightly floured work surface and knead until smooth.
  3. Roll out to make a 30cm x 40cm piece of dough and top with your favourite toppings (see below).  Once topped, roll from long edge, keeping the roll nice and tight and firm.  Slice into 12 equal slices, and place cut side up on baking tray.
  4. Bake in oven at 180C for 30 minutes or until golden brown and cooked through.
  5. These can be stored in an air-tight container in the fridge for a couple of days or can be frozen for up to three months.

Toppings – These are our favourites, but any combination you like;

  1. Tomato sauce, mozarella cheese, ham/bacon and crushed pineapple
  2. Tomato relish, mozarella, tandoori chicken, crumbled feta
  3. BBQ pizzza sauce, mozarella, pepperoni, ham/bacon, chorizo, olives, jalapenos

Thai Fish Cakes

So I made these bad boys a few nights ago, and its taken me until now to get to post them! Super easy to whip up, these little fish cakes are sure to please a crowd, perfect as an entree or an appetiser.  With a good hint of lemongrass and a kick of chilli, dip them in the salty, sweet cucumber dipping sauce and its a match made in heaven.

Prep time 20 minutes, cooking time 10 minutes, makes 15 fish cakes.

img_20160224_205044.jpg

Thai Fish Cakes

600g white fish fillets – I use Hoki

1 clove garlic

2 kaffir lime leaves, centre vein removed and finely sliced

1 tbsp coarsely chopped fresh coriander

1 tbsp fish sauce

3 tsp red curry paste

Pinch salt

5-6 green beans, finely chopped

Peanut oil for shallow frying

1/4c white sugar

1/4c lime juice

1 tbsp fish sauce

1 lebanese cucumber, seeds removed and finely chopped

1 small birds eye chilli, finely chopped

  1. Place fish and garlic in food processor and blend until finely chopped, then add kaffir, coriander, fish sauce, curry paste and salt.  Blend until just combined.  Place into bowl and add chopped beans.
  2. Form mixture into 15 even sized balls and with wet hands flatten to make 6cm patties, then place on plate ready for cooking.
  3. Dipping sauce – Place sugar, lime and fish into small saucepan and cook over low heat until sugar dissolves, remove from heat and add cucumber and chilli, then cool.
  4. Heat oil in large frying pan over high heat, then cook patties in batches for 2-3 minutes each side or until cooked through.  Remove from pan once cooked and drain on paper towel.  Cook remaining patties in batches until all are done.
  5. Arrange fish cakes on serving platter with dipping sauce, and a small Asian style salad if desired.

Cider Glazed Pork Cutlets

Pork cutlets are great at the best of times, but add a sticky, sweet cider glaze and you’ll have your guests talking for weeks to come!  Seen here served with a side of sweet potato mash, steamed broccolini and apple and onion jam, you can serve it with whatever sides you like!

20160223_201129-01.jpeg

Cider Glazed Pork Cutlets

Prep time ~ 5 minutes, cooking time ~ 30 mins, Serves 4

4 pork loin cutlets

Salt

Pepper

2 tbsp butter

3 cloves

1/3c Apple Cider Vinegar

2c Apple Cider (I used Somersby Apple)

1 tsp Dijon Mustard

  1. Melt butter in large heavy based frying pan.  Season cutlets on both sides with salt and pepper.
  2. Once butter begins to froth in pan, add the pork cutlets, cooking 5-7 minutes each side until golden brown.  Remove from pan and cover to keep warm.
  3. Add garlic to cutlet pan, and stir for 30 seconds until fragrent, before adding the cider vinegar, stir well, scraping up any browned juices from the bottom of the pan.
  4. Add apple cider and dijon mustard, and bring to the boil.  Cook until sauce becomes thick and glossy (this can take up to ten minutes depending on the size of your pan)
  5. Once sauce has thickened, return the pork cutlets to the pan, to warm back through, cooking a further 1-2 minutes each side.  Spoon glaze over cutlets as they are cooking.
  6. Serve with your favourite vegetables and a serve of Apple & Onion Jam – recipe can be found HERE

Apple & Onion Jam

Credit for the idea behind this recipe goes to a dear friends of ours, Kiara and Adrian, thank you so very kindly for introducing me to the amazingness that is this delectable, incredibly simple and relatively quick condiment that pairs fantastically with any sort of pork, be it roast pork, crispy pork belly or just a good old pork cutlet.  It transforms a simple piece of meat into an experience not to be forgotten!

20160223_214743-01.jpeg

Apple & Onion Jam

Prep time ~ 15 minutes, cooking time ~ 45 minutes, Serves 4-6

4 apples, peeled, cored and thinly sliced

2 onions, peeling and thinly sliced

90g butter

4 tbsp brown sugar

2 tbsp balsamic vinegar

  1. Melt your butter in a large shallow pan, then add the apple and onion and cook over a medium heat until apples and onions have just started to break down, approx 20-25 minutes.  The mixture will soak up most of the butter and the pan *should* be fairly dry.
  2. Sprinkle in the brown sugar, mixing in until dissolved, at this stage you will notice the pan regains some liquid with the sugar, continue to cook until mix starts to just turn sticky.
  3. Add balsamic vinegar to the pan and stir, cook out until mix is quite sticky, the final product should be quite “jammy” but should just still maintain structure

One Pot Cottage Pie

A great comfort food that will give loads of left overs, this cottage pie is especially great in the winter time. I however am a crazy person and have made it smack bang in the middle of summer. Thank goodness for air conditioning!

This is a great pie to make when you have lots of left over vegies that just need to be eaten. With a cheesy potato-y top, it’s a sure fire way to get kidlets to eat their vegies!

20160223_210014-01.jpeg

One Pot Cottage Pie

Prep time 15 mins, Cooking time 50 mins, Serves 8 – 10

1 large onion – diced

1kg beef mince

4 cloves garlic – chopped finely

2 carrots – diced

½ head broccoli – chopped into small heads

¼ red cabbage – sliced finely

¼ green cabbage – sliced finely

1 cup frozen peas

1 cup frozen beans

5 large potatoes – mashed

810g tin crushed tomato

¾ cup grated cheese (I used a mix of parmesan and tasty)

½ cup red wine

¼ cup Worcestershire sauce

3 tbs tomato paste

3 tsp sugar

4 heaped tsp beef stock powder

3 heaped tsp Gravox traditional gravy – powdered

3 sprigs fresh oregano

3 fresh bay leaves

1 tbs butter

¼ cup milk

Salt and pepper to taste

20160223_210022-01.jpeg

  1. Prepare a large pot that can be used on a stove top as well as oven by heating some oil on a medium/high heat.
  2. Brown the onions and garlic
  3. Add the minced beef. When half cooked sprinkle over the powdered beef stock and mix through. Cook until beef is no longer pink.
  4. Add all the remaining ingredients (except the mashed potato, cheese, butter and milk) and combine.
  5. When bubbling reduced the heat and simmer on medium for 30 minutes or until the liquid is reduced.
  6. Preheat oven to 180 degrees C.
  7. Meanwhile prepare the potatoes. Dice into 3cm cubes and boil until soft. Drain and add butter and milk and mash well. Add salt and pepper to taste.
  8. When mince mixture is reduced remove from heat, spoon over mashed potato and sprinkle generously with cheese.
  9. By this time the oven should be at temperature. Move entire pot of mince and potato to the oven and cook for a further 10-15 minutes, or until the cheese has melted and gone golden.
  10. Now you’re ready to serve!

~A

Easy Pork Stir-fry

You know, I’m not going to lie – it happens to the best of us, there’s days where you just really cant be bothered with getting too creative and when you have grumbles coming from all corners of the house because they’re hungry, getting something on the table ASAP is your top priority!  This is a really simple, tasty stir-fry, which I kind of refer to as a bit of a “cheating” meal when it comes to cooking it (its not by any means unhealthy though!).  Also, if you want to make everything from scratch, you can do that too, just takes a bit longer to prep the veg!

wp-1456048856609.jpg

Easy Pork Stir-Fry

Prep time ~15 minutes, Cook time ~ 15 minutes Serves 4-6 people

6 large Pork Spare Ribs, cut short ways, into 0.5-1cm batons

1 large onion, cut into thin wedges

1 tbsp crushed garlic

1 tbsp peanut oil

1 tsp sesame oil (optional)

850g bag Birds Eye Frozen Oriental Veg (or any other variety that you like)

1 sachet Maggi Sweet & Sticky Pork Sauce (you can find it with the other meal bases)

1 pack Thin Hokkien Noodles (cooked as per packet instructions)

1/4c Oyster and Sweet Chilli sauces

  1. Heat your oils in a large wok until hot, add onion and garlic, cooking until onion just starts to soften.
  2. Add pork pieces, and cook, stirring until browned all over.
  3. Get your noodles soaking, before adding the veggies and sauces to your wok and stirring thoroughly.
  4. Continue cooking until veggies are hot, and sauce has thickened slightly, then add drained noodles to wok and stir.
  5. Serve immediately with a nice cold beer or a cider.

Country style Chicken and Leek Pie

Chicken and Leek pie is one of those things that just screams comfort food to me. Deliciously creamy on the inside with amazingly crunchy puff pastry on top, this pie is sure to appeal to just about everyone! This is a favourite of my husband’s and one of the only ways I can get him to touch leek! He especially loves it when I add the “swirls” as he calls them, on top.

Prep time 10 mins, Cooking time 40 mins, Serves 4-6

wp-1455882246926.jpg

wp-1455880750079.jpg

Country Style Chicken and Leek Pie

2 Skinless chicken breast fillets – diced into 2cm cubes

1 Large leek – chopped into rounds, about 1cm thick

2 tbs butter

1 tbs plain flour – to thicken

½ cup thickened cream

½ cup milk

2 sprigs of thyme

1 tsp Chicken stock powder

1 sheet short crust pastry (for the base, you will need enough to cover the base and sides of your baking dish)

2 sheets puff pastry (for the pie lid, and of course the swirls!)

Sea salt and cracked pepper to taste

  1. Pre heat oven to 180 degrees C. In a large frying pan over a medium/high heat add 1tbs butter and the chopped chicken to the pan and cook until golden. Set aside but keep warm.
  2. Add ½ tbs of the remaining butter and chopped leek to the pan and sauté until the leek is tender. Set aside with the chicken.**
  3. In the pan now add the remaining butter and flour, stirring until combined, then add the cream and milk, stirring gently.**
  4. Reduce to a low head and add to the cream mixture the chicken and leek, the thyme and chicken stock. Let simmer for a few minutes until the sauce is thick enough to your liking.
  5. Meanwhile, prepare your baking dish by lightly greasing and laying down a sheet of your short crust pastry and press into the sides and base of the dish lightly. When ready fill the dish with the chicken mixture. Lay a sheet of puff pastry as a lid to close the pie, pressing down around the edges of dish to seal. For extra points, go ahead and slice the remaining sheet of puff pastry into 1 cm strips. Roll these strips up to resemble the sliced leek and place on top of your pie lid.
  6. Brush the pie with egg wash and place into the oven and bake for 30-40minutes, or until pastry is cooked and golden brown.
  7. Enjoy!

imageimage

**Added extra – If you would like to add some white wine into the dish you would do so at this stage, sautéing the leek until the alcohol has evaporated. Also, if you want to get extra fancy, why not try adding in a tablespoon of Dijon mustard.

~A

Spaghetti Carbonara

This would be one of my husband Alex’s favourite pasta dishes, as we call it, Car-banana!  Who doesn’t love those gorgeous tendrils of carbohydrates, bathed in shiny, creamy eggs and piled high with crispy, salty bacon.  Did someone say bacon? OOOOH BACON. Then there’s the lashing of fresh shaved parmesan, herbs and just to add a little bit more grown up bang, a sprinkle of fresh birds eye chili!

20160218_205508-01.jpeg

Spaghetti Carbonara

Prep time ~15 minutes, Cook time ~ 10 minutes – Total 25 minutes. Serves 6

500g Fresh spaghetti or linguine

Rock salt

12 rashes bacon (just the streaky bit, keep the eye for breakfast!), sliced in to 1cm batons

8 large eggs or 10 medium eggs, beaten lightly

1c grated parmesan cheese

2 tbsp fresh chopped basil

4 birds eye chili, finely sliced (seeds out if you dont like it too hot, or left out if you like it tame)

Fresh ground black pepper

  1. Bring a large pot of water to a rolling boil, season generously with rock salt, and cook pasta to direction as per packet – I find with fresh pasta, if you start the pasta just as you start cooking the bacon, it times quite nicely.  Drain the pasta, reserving approx 1/2c of the cooking water
  2. Drop the bacon into a just warm pan, then turn the heat up and cook for approx 8 minutes until its nice and crispy and has produced a bit of oil.  Add the cooked spaghetti and reserved water and stir.
  3. Add the beaten eggs, parmesan and a generous sprinkle of black pepper and toss to coat then continue cooking for a further 2 minutes – its REALLY important to keep the pasta moving at this point or you’ll end up with scrambled eggs and bacon.
  4. Once the sauce is nice and creamy, add the basil, and chili, and serve with some extra shaved parmesan.

ENJOY!

~LC

Pork and Prawn Dumplings

These delicious Pork and Prawn Dumplings are sure to get your taste buds firing. Crispy underneath with just the right amount soft deliciousness on top, you wont want to stop at just one! Perfect for parties, or anywhere finger food is acceptable (like my couch with my cat, or Lauren’s couch with her dog) you can’t go wrong with these babies!

Prep time 1 hr, Cook time 30 mins, Total time 1 hr 30 mins, Makes 48

20160216_194930-01

Pork and Prawn Dumplings

4cm pieces of ginger, peeled

250g Chinese cabbage, finely shredded

250g minced pork

250g prawns, chopped finely

4 spring onions, finely chopped

2 tbs soy sauce

1 tbs oyster sauce

2 tsp sesame oil

1 tbs rice wine/cooking sake

Cornflower, for dusting and extra if filling needs to be thickened

2 x 275g pkts gow gee pastries (wrappers)

1/3 cup (80ml) peanut oil

1 tbs salt

  1. Place shredded cabbage in a large bowl and sprinkle with salt then leave for 30 minutes.
  2. While cabbage is sitting, chop the prawn meat finely and place in a separate bowl with the pork mince and spring onions.
  3. Add the sauces directly to the meat mixture and combine.
  4. Returning to the cabbage, thoroughly squeeze to removed all liquid then add to the meat.
  5. Line a large tray with baking paper and dust with cornflour. Wet the edge of a wrapper with a little water and place two level teaspoons of filling in the centre (do not over fill!). Fold the wrapper in half and using your thumb and index finger pleat the edges, pressing them together to create a seal. Place the completed dumplings in a single layer on the prepared tray. **20160216_192206-01
  6. Heat 1 tbs peanut oil in a non-stick frying pan over a medium to high heat, adding 12 dumplings at a time pleated side up in a single layer and cook for 1-2 minutes or until brown underneath. Add 1/2 a cup of boiling water to the pan and partially cover with a lid, cooking for a further 8-10 minutes or until the water has evaporated and the dumplings are crisp on the bottom.
  7. They are now ready to eat! Just add in your favourite dipping sauce and you’re good to go.

**Dumplings can be made up to six hours in advance, but must be stored in a air tight container in the refrigerator.

~A + L

20160216_194307-01

20160216_192151-01

Chicken Yakisoba

One of my favourite Japanese dishes would have to be Yakisoba. To me it’s like a comfort food, but with veggies. Yaki, meaning grilled and soba meaning noodles, this meal of grilled noodles is easy to make in a fry-pan or wok.

It’s one of those meals you can get just about anywhere in Japan, but the best comes from street vendors or little hole in the wall restaurants.

In Australia finding the right ingredients to get the taste just right can be a bit of a challenge. If you’re lucky enough to live near an Asian grocery store you might be able to find pre-made Yakisoba sauce, if not, try this recipe it’s pretty good!

Prep time 10 mins, Cook time 20 mins, Total time 30 mins, Serves 4

20160215-892809535

Chicken Yakisoba

3 Shitake mushrooms – sliced (can be replaced with regular mushrooms if unavailable)

1 Brown onion – sliced into thin wedges

1 Carrot – halved and sliced on an angle

1 Bunch of broccolini chopped roughly

4 Cabbage leaves – chopped

2 Small chicken breasts – diced (can be replaced with your choice of meat, beef, pork, prawns)

1-2 Tbsp peanut oil

Freshly ground black pepper (to taste)

Yakisoba noodles (if unavailable, ramen or hokkien will also work)

Yakisoba Sauce

80ml Worcestershire sauce

60ml oyster sauce

40ml ketchup

30ml soy sauce

30ml sugar

  1. Slice the mushrooms, carrot and the onion. Chop the brocollini and the cabbage into smaller pieces. Cut the meat into 1 inch pieces.
  2. Mix the sauce ingredients in a small bowl and set aside from later.
  3. In a wok, heat the oil on medium to high heat. Cook the chicken through until there is no pink visible.
  4. Add the vegetables into the wok and stir fry until soft.
  5. Add the black pepper and ¼ of the Yakisoba sauce and stir, lower the heat to medium.
  6. Cook noodles of choice as per packet instructions. When soft gently pull apart and drain, then add to the wok. Stir noodles into the mixture being careful not to burn the noodles on the bottom of the wok
  7. Add remaining sauce (if you don’t like it super saucy don’t add all of it) and mix through.

Optional extras

  • Feel free to add in any extra vegies, things like zucchini and capsicum also taste great in this dish!
  • If you feel like being really fancy feel free to top the dish with some strips of dried seaweed and pickled red ginger, but if you’re like me you’ll just tuck in right away!

Itadakimasu!

~A