Chocolate Tart

I recently spent the Easter weekend with my Mum in Cairns. I don’t get to see her as often as I would like, so this year I promised myself and her that I would make an effort to spend more time with her despite the 400 km distance between us.

So like the old days when I still lived at home, when we come together there is usually a lot of food related activities to be had! When I was little we would always be making something in the kitchen, usually baking on the weekends when we had time away from school and work.

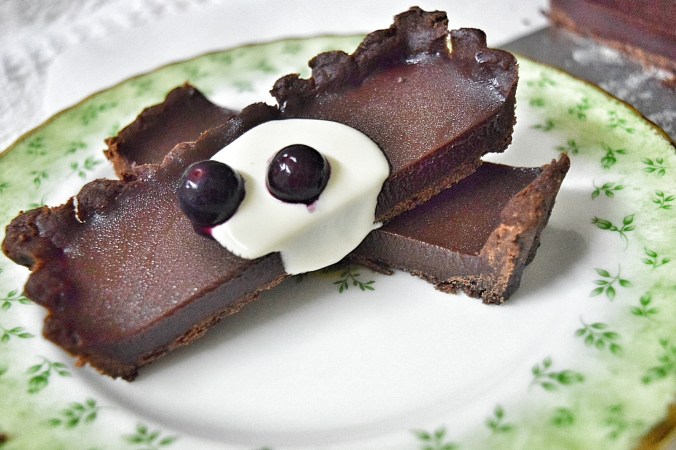
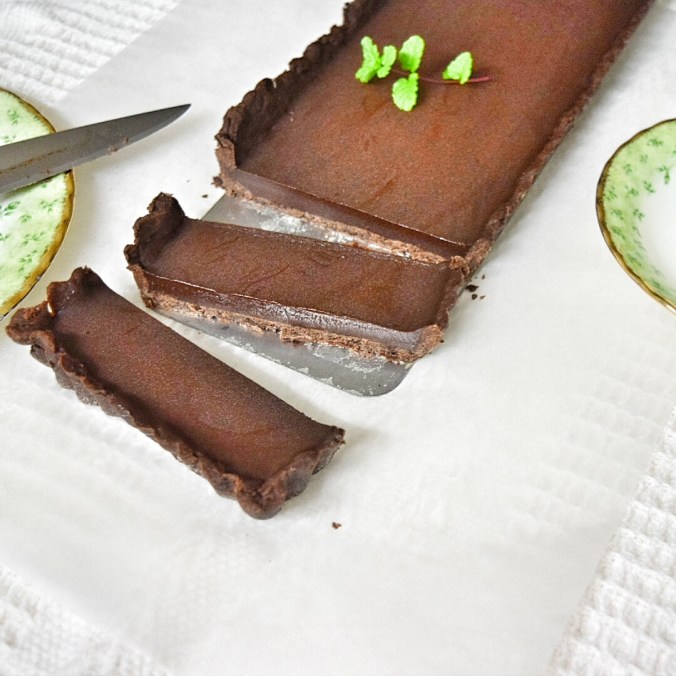
Almost like making up for lost time, this weekend we baked up a storm, making two of these delicious chocolate tarts (one for Mum’s great neighbours and one for us) and one very yummy New York Baked Cheesecake, soon to be shared on The Strange Couple.

This tart is super easy and anyone should be able to make it. We did use a food processor but if you’re feeling strong enough you could mix the pastry dough by hand too. The chocolate filling is divine and ridiculously simple to make. You might consider this as the perfect dessert next time you’re entertaining guests (or just want something chocolaty for yourself!).

Prep time – 30 mins, Cooking time – 30 mins + 30 mins setting time, Serves 8-10

dsc_0414-01.jpeg

dsc_0408-01.jpeg

Chocolate Tart

Base

1 ½ cups plain flour

¼ cup cocoa powder

¼ cup icing mixture

180g cold butter – chopped

Filling

½ cup cream

30g butter – chopped

200g dark cooking chocolate – chopped

  1. Preheat oven to 180 degrees C, and prepare a tart tin about 34 x 11.5cm with a little butter and flour.
  2. Sift flour, cocoa powder and icing mixture, place into a food processor with the cold chopped butter. Use the pulse setting to process the mixture until it resembles crumbs. Add about 3 table spoons of iced water and process again in pulses until the mixture comes together to form clumps. Ensure mixture is moist by pinching a bit of the mixture, if it looks too dry add a touch more iced water.
  3. When clumping, remove the dough from the processor onto a flat surface and roll out with a rolling pin to about 5mm thickness and make sure it will be long and wide enough to fit your tin. This recipe should yield more than enough dough to cover the dimensions of the tin.
  4. Lay the pastry into the prepared tin and lay some baking paper on top of the pastry and fill with dried rice or beans and bake for 15 mins, remove the rice or beans from the pastry and bake for a further 15 mins or until the pastry is dry and cooked through. Allow to cool.
  5. For the filling heat the cream, butter and chocolate in a small saucepan over a low heat until the chocolate begins to meld. Remove from the heat and stand, stirring often until melted and smooth.
  6. When pastry base is cool, pour in the chocolate mixture and smooth out.
  7. Place tart in the fridge until the chocolate has set.
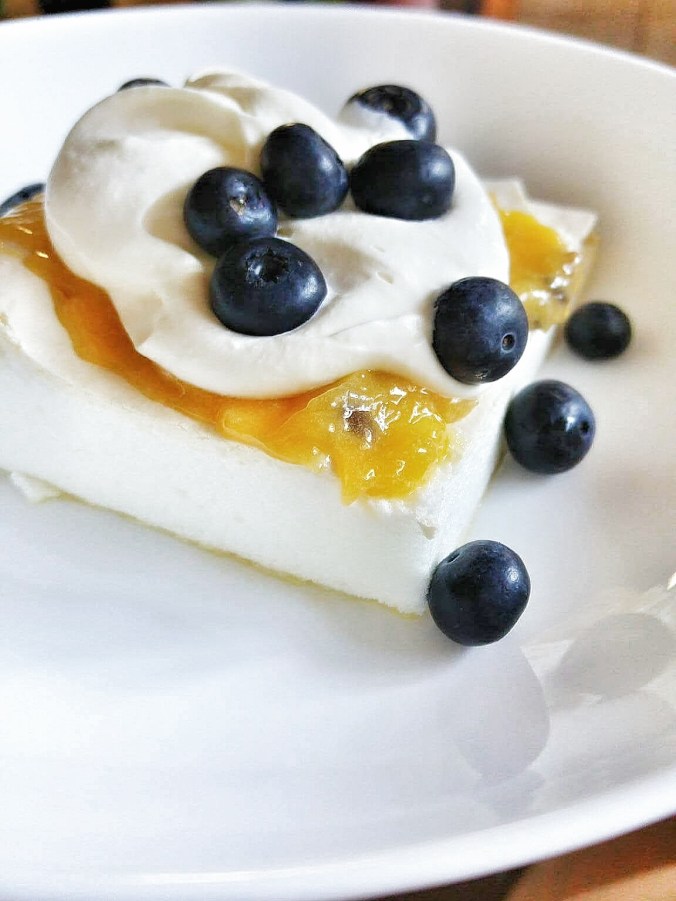
  8. Serve with fresh cream and berries and enjoy!

~A

dsc_0415-01.jpegdsc_0410-01.jpeg

Easy Meringue

This is the easiest Meringue recipe you will ever find. I decided to make a meringue after my last post Orange Poppy Seed Cake with Passionfruit Curd and Glaze. The curd required 5 egg yolks and I was left with all the egg whites. I don’t like waste, and I rather like meringue so it only made sense!

This meringue can me made into small rounds, or as large bases for toppings of cream and fruit.

With only two ingredients, why not give it a go 🙂

Prep time 5 mins, Cooking time 3 hours, Serves 8

received_10153340610526962-01.jpeg

201603201911536160.jpg

Easy Meringue

4 egg whites

220g caster sugar

  1. Preheat oven to 150 degrees C. In a bowl beat egg whites on low with an electric beater until the whites start to go foamy and bubble, turn beater to high and continue until eggs form soft peaks.
  2. Begin to add the sugar, about 1 tbs at a time, over the course of 2-3 minutes the eggs should turn stiff and glossy.
  3. Line a baking try with grease proof paper and begin to spoon out your meringue mixture. It’s at this point that you can get creative, forming your meringue into shapes, or just a slab.
  4. Reduce the oven to 140 degrees C and place tray into oven. Leave to bake for 35-40 minutes, then turn off the oven and leave in place for a further 2-3 hours to dry out.
  5. When cool, top with your favourite fruits and cream and enjoy!

~A

201603201600285622.jpg

img_20160320_155404.jpg

Orange Poppy Seed Cake with Passionfruit Curd & Glaze

This weekend I went to visit my friend today who until recently has been in hospital recovering from quite a large surgery. I didn’t want to go empty handed so I decided to make cake! Because well, you know, these situations need cake…

So to the internet I went, searching for something to make out of the ingredients I already had in the pantry. The star of the show had to be the passionfruit as I had a big tin just sitting there waiting to be eaten. I found a few recipes that I thought looked easy enough and would combine well to make something pretty special, so here it is, my Orange Poppy Seed Cake with Passionfruit Curd and Glaze.

Prep time – 20 mins, Cooking time – 30 mins, Cooling time – 2 hrs, Serves 12

20160320585458787.jpg

201603201729868850.jpg

201603201088766735.jpg2016032064657420.jpg

Poppy Seed Cake with Passionfruit Curd & Glaze

Cake

2 ½ cups plain flour plus more for dusting tins

2tsp baking powder

½ teaspoon salt

1 ½ cup caster sugar

Zest of 1 orange

225g unsalted butter room temperature, plus more greasing tins

2 large eggs lightly beaten, room temperature

1tsp vanilla extract

1 cup milk, room temperature

2 tbs poppy seeds

Curd

Check out this link for our yummy Passionfruit curd!

Note: This recipe will make much more curd than needed for the cake so make sure to store and use for other goodies coming up on the blog 🙂

Glaze

1 cup icing sugar

3 tablespoons passionfruit pulp

1 tablespoon orange juice, freshly squeezed

Cake

  1. Preheat oven to 180 degrees C; place oven rack in middle position. Prepare two 20cm round cake tins; grease and line with baking paper then grease and flour baking paper and set aside.
  2. In a large bowl sift together flour, baking powder, and salt. Set aside. In a medium bowl combine orange zest with the sugar and mix through, it should resemble semi-wet sand when completely mixed.
  3. Add soft butter to sugar mixture and using an electric beater mix until smooth, drizzle in eggs slowly, all the while beating the mixture through. Add vanilla last and combine.
  4. Into your flour pour your sugar mixture and stir with a wooden spoon to combine slightly, then return the electric beater and mix thoroughly.
  5. Fold poppy seeds into cake batter until evenly distributed.
  6. Divide batter between the cake tins and bake for 20mins, then check and rotate pans from front to back, then cook for a further 10mins or until a skewer comes cleanly out of the centre of the cake.
  7. When baked transfer cakes to a wire rack to cool. When cool to touch turn out cakes, and set on racks top-side up. Cool completely.

Glaze

  1. In a medium bowl sift the sugar, add the passionfruit pulp and orange juice and whisk well to combine. The mixture should be just thick.

Assembling your cake

  1. Remove any remaining baking paper from the cakes. If your cakes are slightly rounded at the tops you will need to slice the rounded top off the bottom layer so your cakes stack well.
  2. Place bottom layer of the cake on your chosen serving platter and spread about ¼ cup of curd over the top. Carefully place the top cake over the curd layer and press lightly down to make some of the curd just start to ooze out the sides.  If you wish to have multiple layers feel free to repeat this process until your cake is the desired height.
  3. Once layering is complete chill your cake in the fridge for 1 hour. This will help later when you add the glaze.
  4. When cool, pour the glaze over the top of the cake and allow it to run down the sides. Allow glaze to set before serving – about ½ an hour.
  5. Find some friends to share with and enjoy!

~A

img_20160320_161610.jpg

Easy Blueberry Muffins

Growing up blueberries were a constant staple in our household. I swear my mum had a slight obsession with them! Sundays nearly always consisted of super thin pancakes rolled with blue berries in the middle and dusted with icing sugar, so yummy!

I love these muffins because the flavours remind me so much of those Sunday treats but they are so much more user friendly! Perfect for morning tea snacks, or a quick breakfast option you wont regret making these muffins.

Prep time 15 mins, Cooking time 20 mins, Makes 12

dsc_0353-01.jpeg

dsc_0352-01.jpeg

Easy Blueberry Muffins

1 cup canned blueberries – drained (can also use fresh or frozen, or any other berry of your choosing!)

1 cup self-raising flour

1 cup plain flour

1 tsp baking powder

¾ cup milk

¼ cup vegetable oil

½ cup caster sugar

½ tsp salt

1 large egg

Cinnamon sugar

dsc_0351-01.jpeg

dsc_0350-01.jpeg

  1. Preheat oven to 200 degrees C. Prepare your muffin tray by either placing muffin cups into the tray or by greasing the tray.
  2. In a mixing bowl beat together the egg, milk and oil until well combined.
  3. Once combined place a sieve on top of the mixing bowl and place in gently the flours, baking powder, sugar and salt. Once all in sift into the wet ingredients mixture. Using a wooden spoon mix flour and egg mixture together until smooth.
  4. Gently fold in the blueberries (or your choice of fruit).
  5. Scoop about 2 tbs worth of muffin batter into your prepared muffin tray cups. Top with a sprinkle of cinnamon sugar.
  6. Bake for about 20-25mins or until a skewer comes out clean.
  7. Enjoy!

~A

Ginger Earthquake Cookies

What better way to spend your Sunday afternoon than whipping up a batch of these yummy, gingery, creative looking cookies.  The “earthquake” look comes from rolling the balls of chilled dough in icing sugar before baking them.  The crucial part comes with making sure that dough is super cold before you roll the cookies, or you end up with ginger earthquake pancakes!

These cookies are so more-ish, you better make sure you bake a few, once your friends catch on to these, they’ll be begging for more!

Prep Time ~ 2 hours (including chilling time) Cooking time ~ 15 mins a tray

Makes approx 100 cookies (you can very easily halve this recipe if you don’t want as many!)

IMG_1820

Ginger Earthquake Cookies

200g butter

2/3c Golden Syrup

3c Plain Flour

1 1/2c Brown Sugar

2 eggs, lightly whisked

4 tsp ground ginger

2 tsp mixed spice

1/2 tsp ground cloves

1/2 tsp bicarb soda

1/2c icing sugar

  1. Combine the butter and golden syrup in a medium saucepan over low heat. Cook, stirring, for 3 minutes or until butter melts and mixture is well combined. Remove from heat and transfer to a large bowl.

  2. Add the flour, brown sugar, egg, ginger, mixed spice, cloves and bicarbonate of soda and stir to combine. Cover with plastic wrap and place in the freezer for 80 minutes or until cool and firm.

  3. Preheat oven to 180C. Line oven trays with baking paper. Sift the icing sugar onto a small plate. Roll half teaspoons of mixture into balls (think cherry sized) and roll in icing sugar. Place on the lined trays, 6cm apart, allowing room for spreading.

  4. Bake in preheated oven, swapping trays halfway through cooking, for 15 minutes or until lightly golden. Remove from oven and set aside on trays to cool completely.

If you’re finding these cookies are spreading too quickly when they’re baking, chill your dough even further, when you’re rolling them, the dough should be quite firm, and not be sticky.

My only other warning, is that if you’re anything like I am, where quality control is crucial, that taste testing this batter raw is not a great idea! Try if you like, but you’ve been warned 🙂

Happy Baking ~ LC

Basic Pancakes

I woke up this morning and it was raining! If you know anything about North Queensland you’ll know that we have been in drought and haven’t seen consistent rain in a long while!

So when I went to bed and it was raining, then woke up and it was STILL raining, I figured it was time to celebrate!

Pancakes seemed like a fitting Saturday morning celebration food!

These are super simple, very yummy and is easy enough to double if you have to feed a crowd.

Prep time 10 mins, Cooking time 10 mins, Serves 2 (4 small pancakes per person)

dsc_0319-01.jpeg

dsc_0320-01.jpeg

Basic Pancakes

1 cup self-raising flour, sifted

Pinch of salt

2 tbs white sugar

¾ cup milk

1 egg, beaten

30g butter, melted

1 tsp vanilla extract

Spray oil for cooking

dsc_0321-01.jpeg

  1. In a medium bowl combine flour, sugar and pinch of salt.
  2. In a separate bowl, melt the butter in the microwave on high for about 30 seconds.
  3. Into the butter add milk, vanilla and beaten egg. Be sure to do it in this order, if you add the egg first the heat from the butter may cook it, but if you cool with milk first you should be ok!
  4. Create a dimple in the centre of the flour mixture and pour the wet mixture into the hole you have made. Stir until well combined. You should have no lumps; the batter should be thick and smooth. Set the batter aside for 5-10 minutes.
  5. Heat a heavy-bottomed, non-stick pan over a low-medium heat and coat it with oil. Use a consistent amount when making these pancakes so that they turn out roughly the same size. I used a small ladle, you may want to use a 1/4 measuring cup.
  6. Cook until the initial side is golden, or until the top surface forms bubbles. Flip and repeat on the other side. I found to help the cooking process go faster, simply place a lid on the frying pan while cooking. This also helps solidify the top side so that when you go to flip you don’t end up with a battery mess.
  7. Enjoy with your favourite toppings (for me that’s maple syrup or fresh fruit!)

~A

dsc_0322-01.jpeg

dsc_0320-02.jpeg

The Ultimate Hedgehog Slice

Back in the day I had been known, when feeling slack, to delve into the realm of packet mixes. I know, slap me on the wrist.

One day, my husband Paul decided that he wanted me to make hedgehog slice. So off we went to the shops ready to get all the ingredients, but as we were cruising down the baking isle he spotted a packet mix for the slice. He told me I should save myself the trouble and just use  a packet mix. I tried to talk him out of it but no, he wanted the packet mix because the picture on front looked soooooo amazing. So I gave in.

You know those Pinterest fails that are going around the internet? Yes? Well it basically turned out like that! My guess is at the time we got it, it must have been out of date because what it turned out as was anything but the delicious hedgehog slice shown on the packet! It resembled tar. No joke, and it didn’t taste much better either!

So from that day forward I vowed never again to use a packet mix. My solution to the lazy man’s Hedgehog slice follows! Fair warning though, this baby is so rich and delicious you may only be able to handle a little at a time!

Serves 15, Prep time 20 mins, Total time for cooling approx.  6 hrs/overnight

dsc_0315-01.jpeg

dsc_0311-01.jpeg

Ultimate Hedgehog Slice

400g dark melting chocolate

150g butter

1cup icing sugar

1 ½ packets Arnott’s Scotch Finger biscuits

150 g packet hazelnuts – chopped

1 egg – beaten

1tsp vanilla extract

Icing

1 cup icing sugar

½ cup cocoa powder

2tbs milk/water

Chocolate flakes (optional extra)

dsc_0314-01-01.jpeg

  1. Melt chocolate, butter and sugar in a glass bowl, you can use the microwave for this just be sure to stop every 30 seconds to stir.
  2. Once completely melted and mixed together add the egg and vanilla extract. Be sure to combine well, then heat once more in the microwave for 30 seconds to ensure the egg stays warm enough to cook through. Your mixture should turn a glossy chocolate colour and be smooth.
  3. In a separate bowl crush the biscuits and mix in the chopped hazelnuts.
  4. Add the biscuit mix to the chocolate and combine until all the biscuits are covered in chocolate.
  5. Spoon mixture into a lined 20 x 30cm slice tin pressing down to ensure the mixture is packed in.
  6. For the icing, simply mix all ingredients together to form a thick paste. When fully combined drizzle the icing over the slice evenly to smooth out the surface. You can also tap the tin lightly on your counter top to reduce any air bubbles or gaps that might not have been filled at first. Feel free at this point to top with chocolate flakes.
  7. Chill in the fridge over night or for at least 6 hours. When fully hardened remove from the time dust with icing sugar and slice with a sharp hot knife (run under hot water – I managed to cut 15 slices about 2-3 inches square, this is very rich so if you think you you can handle more, feel free to cut larger slices!).
  8. Enjoy!

~A

Jam Drop Biscuits

An oldie but a goodie these jam drops will leave you wanting more! Very quick and easy to make, these biccies come out light and fluffy and are a total crowd pleaser.

Prep time 10 mins, Cooking time 20 mins, Makes 24

image

image

Jam Drop Biscuits

125g butter – softened

2 large eggs

2 cups self raising flour

3/4 cup caster sugar

1tbs lemon juice

1tsp vanilla essence

1/4 cup jam – choose your favourite flavour

image

  1. Preheat oven to 180 degrees C.
  2. Line two trays with baking paper and lightly grease.
  3. Combine the butter and sugar using an electric beater until smooth and creamy.
  4. Add eggs, lemon juice and vanilla essence and continue to beat until smooth.
  5. When fully mixed add flour and stir in to form a dough. If the mix is too damp add a little more flour.
  6. Form small balls out of the dough and place on baking trays. With a spoon or your finger make small but deep holes in the center of your dough balls. Fill with your favourite jam and place in the oven for 20 mins or until golden.
  7. Remove from oven and let sit for a few minutes before transferring to a cooling rack.
  8. Enjoy!

-A

image

Golden Syrup Dumplings

When I think of Golden Syrup Dumplings, I think old school classic favourite, skip the healthy and go for downright yum.  Naughty and nice, that sweetness from the brown sugar, cut through by the slightly bitter golden syrup flavour.  Topped with a dash of cream and a scoop of vanilla ice-cream turns this into a perfect dessert, but one that you definitely need to leave plenty of room for! Can anyone say sugar coma?

Prep Time 25 mins, Cook Time 20 minutes – Serves 6

img_20160229_202933.jpg

Golden Syrup Dumplings

Dumplings

190g (1 1/4 cups) self-raising flour

40g butter, chilled, chopped

80ml (1/3 cup) milk

80ml (1/3 cup) golden syrup

Syrup Sauce

500ml (2 cups) boiling water

185ml (3/4 cup) golden syrup

100g (1/2 cup, firmly packed) brown sugar

40g butter

  1. Mix ingredients for sauce in a heavy based pot and place over a medium heat until butter has melted and mix has come to a simmer.
  2. While sauce is heating, place flour and butter in bowl and rub butter in until it forms a light crumb.
  3. Add milk and golden syrup into flour and butter, then portion into 18 dumplings.
  4. Place dumplings into simmering syrup sauce and cook for 20 minutes until dumplings have puffed up and sauce has thickened slightly.
  5. Serve with a scoop of ice cream and a drizzle of thickened cream

photogrid_1456743333155.jpg

Sit back and enjoy – remember to share with friends, because as nice as these are, they’re liable to make you feel a touch ill if you eat too many 🙂 Cheers ~LC

Apple Rose Tartlets

I’ve always admired food that had been made to look like something else. When I discovered just how easy it was to make these tartlets I jumped on the bandwagon!

Impress your guests with this super simple but impressive treat of beautifully rose-shaped apples in crispy sweet puff pastry.

Prep time 10 mins, Cooking time 40-50 mins, Makes 8

20160227_210804-01.jpeg

Apple Rose Tartlets

2 sheets puff pastry

2 red apples (red delicious are perfect)

3 tsp apricot jam

4tsp water

½ tsp lemon juice

1tsp Icing sugar (plus extra to dust)

1tsp cinnamon sugar

20160227_210738-01.jpeg

  1. Preheat oven to 180 degrees C. Prepare the apple by chopping in half and coring, then slice finely as pictured.20160227_200016-01.jpeg
  2. Place sliced apple, 3 tsp water, lemon juice and sugar in a bowl and toss, microwave on high for 1 minute or until apple is pliable. Drain liquid.
  3. Cut pastry sheets into four equal strips and lay apple slices as shown below.
  4. Mix remaining water and jam in a bowl then add jam mixture to pastry before folding pastry up and rolling (as pictured). Make sure to pinch the sides and push the apple into the pastry as rolling as it may try to slip out.

  5. Place rosettes into an oiled muffin pan and cook in the oven for approx. 45 minutes (checking from about 40mins onwards).
  6. When cooked dust tartlets with icing and cinnamon sugars and serve.
  7. Enjoy!

~A